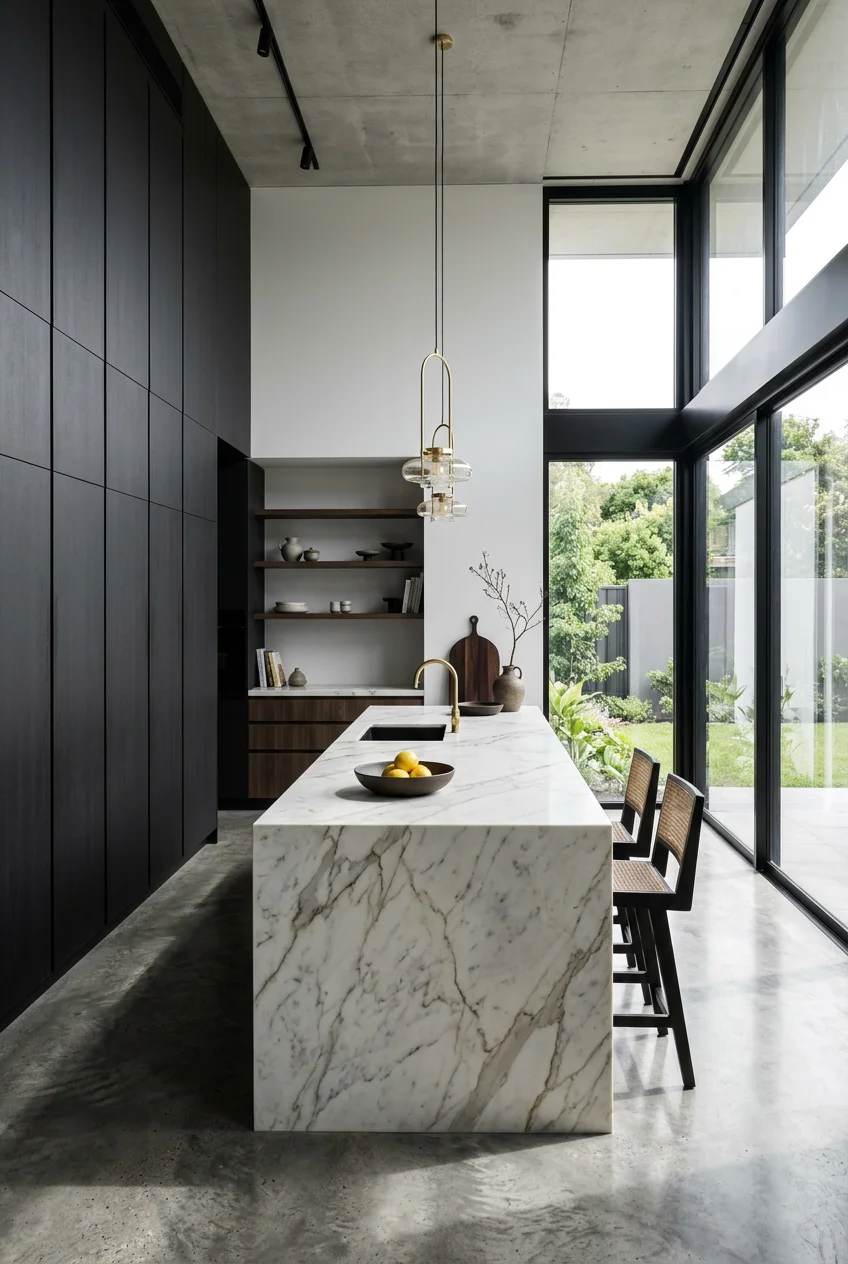
What’s Inside
- Embrace the No-Kitchen Kitchen with Integrated Appliances
- Prioritize Handleless Cabinetry with Push-to-Open Systems
- Invest in Matte Natural Stone Countertops
- Implement Quiet Materiality for a Cohesive Palette
- Design for Workflow First in Your Luxury Minimalist Kitchen
- Integrate Hidden Smart Technology
- Utilize Appliance Garages to Hide Counter Clutter
- Specify Generous Island Clearances
- Install Layered and Integrated LED Lighting
- Choose Warm, Muted Color Palettes Over Stark White
- Opt for Waterfall Countertops and Slab Backsplashes
- Integrate Hidden Charging Stations and Tech Hubs
- Add Climate-Controlled Storage Zones
- Use Undercabinet Plug Molding for a Clean Backsplash
- Embrace Sustainable Materials in Your Luxury Minimalist Kitchen
- Install Modular Drawer Organizers
- Position Prep Sinks Strategically on Islands
- Select High-End, Restrained Fixtures
Last November, I stood in my kitchen holding a $14 block of Parmigiano-Reggiano from Whole Foods, staring at a countertop so cluttered with appliances I couldn’t find a single flat surface to grate it. That moment of frustration forced me to rethink how a luxury minimalist kitchen actually functions. A true luxury minimalist kitchen isn’t just an empty white room for show. It requires strict discipline regarding materials, exact measurements for workflow, and a refusal to let small appliances dictate your counter space. I tried the generic open-shelving trend for months before figuring it out. Dust mixed with cooking grease coated my plates, and the visual noise gave me a headache. True minimalism hides the mechanics of cooking while highlighting premium, quiet materials. I’m going to walk you through 18 specific design rules, complete with exact measurements and material costs, that create a functional, high-end space. Let’s look at the actual mechanics of building a kitchen that works as well as it looks.
1. Embrace the No-Kitchen Kitchen with Integrated Appliances

Visible stainless steel appliances break the visual line of your cabinetry. To fix this, you’ll need fully integrated, panel-ready appliances that disappear into the wall. I installed a 36-inch JennAir column refrigerator for $8,500, and covering it with a custom matte oak panel completely altered the room’s depth. When your refrigerator, dishwasher, and even your oven blend into the background, the space feels like an extension of your living room rather than a utilitarian prep zone. This is a primary trend for 2026 because it reduces visual clutter instantly. Standard stainless appliances reflect light unevenly and show fingerprints constantly. Panel-ready options require a larger upfront budget, usually adding $1,500 to $2,000 for the custom cabinet fronts alone, but the resulting uninterrupted visual flow justifies the cost. If you’re planning a remodel, specify panel-ready dimensions to your cabinet maker before ordering any appliances.
2. Prioritize Handleless Cabinetry with Push-to-Open Systems

External hardware creates unnecessary visual noise and physical obstacles. I used to constantly catch my pockets on heavy brass drawer pulls while walking past my old island. Learned that the hard way. Moving to a handleless design solves this. Systems like the Nobilia nBox drawer system or the Bulthaup b3 offer concealed drawer guides with push-to-open mechanisms. You simply press the flat panel with your knee or hand, and the drawer glides out. This upgrade typically costs an additional $1,200 to $2,500 depending on the size of your kitchen, but it’s essential for a flat, clean aesthetic. One common mistake is buying cheap push-latches from a hardware store. They wear out in six months and leave your drawers sitting slightly ajar. Invest in heavy-duty, integrated push-to-open tracks rated for at least 75 pounds so your heavy pots and pans won’t cause the mechanism to fail over time.
3. Invest in Matte Natural Stone Countertops

Engineered glossy quartz is highly reflective and shows every single smudge. I switched to honed natural stone after my glossy white quartz started looking permanently greasy under overhead lights. For a high-end look, choose quartzite like Taj Mahal or marble treated with Azerocare for stain resistance. Expect to pay between $135 and $200 per square foot installed for premium natural stones. A honed or matte finish absorbs light rather than reflecting it, which hides fingerprints and daily dust much more effectively. The texture of matte stone also feels warmer and more organic under your hands. Pro tip: Always view your actual slab at the stone yard before purchasing. Natural veining varies wildly, and a small 4×4 inch sample won’t show you the heavy mineral deposits that might end up right in the middle of your prep zone.

Wagensteiger Stainless Steel Curved Garlic Presser or
If you want something that just works, Wagensteiger Stainless Steel Curved Garlic Presser or Cheese Grater is a safe bet (13 reviews, 4.5 stars).
4. Implement Quiet Materiality for a Cohesive Palette

Industrial designer Naoto Fukasawa promotes a concept where materials agree with one another to create a calm atmosphere. You achieve this by choosing a highly disciplined palette. Pair powder-coated cabinet planes with warm white oak and soft, muted stone. I used a custom flat-panel cabinet profile painted in a muted bone color, which cost about $85 per gallon for premium cabinet enamel. When materials contrast too sharply, like stark white cabinets against dark black granite, the eye jumps around the room. This creates a feeling of chaos even if the counters are empty. Building warmth through tone, reflectance, and texture prevents the need for decorative clutter. You won’t need to add countertop plants or decorative jars if the base materials already provide enough visual interest through their natural grain and matte finishes.
5. Design for Workflow First in Your Luxury Minimalist Kitchen

A beautiful design that hinders your cooking process is a failure. I learned this the hard way when I placed my refrigerator 12 feet away from my sink. Dragging a 20-pound bag of rice from Costco across the entire room every time I needed to prep dinner was exhausting. The classic kitchen triangle (sink, stovetop, refrigerator) remains the standard for a reason. Keep the total distance of all three legs of the triangle between 13 and 26 feet. If you have a massive 10-foot island, don’t center the main sink. Place a primary or prep sink to one side. This preserves a massive continuous 6-foot block of counter space for rolling out dough or assembling large meals. Functionality dictates that you need a clear, unobstructed path between your primary cooling, washing, and cooking zones.
6. Integrate Hidden Smart Technology

The smartest kitchens in 2026 hide their technology. A large touch screen on the front of a refrigerator ruins a minimalist aesthetic. Instead, look for appliances with internal tech. I recently tested a GE Profile smart refrigerator that costs around $3,200. It features internal cameras and barcode scanners. When I’m standing in the middle of Kroger and can’t remember if I have enough heavy cream, I pull up the app and look inside my fridge. The exterior remains a perfectly flat, custom-paneled surface. Voice-activated features are also highly practical. When your hands are covered in olive oil, telling your oven to preheat to 400 degrees is incredibly efficient. The key is ensuring none of this technology requires visible exterior screens, blinking lights, or bulky plastic housings that clutter the space. You might also like: 20 Charming Minimalist Simple Living Lifestyle Tips Worth Trying This Year

Public Goods Kitchen Tool Set | 6 Piece Kitchen Utensil Set
Public Goods Kitchen Tool Set | 6 Piece Kitchen Utensil Set | Includes has been one of the most consistently praised picks in this category. 35 reviewers averaged 4.5/5.
7. Utilize Appliance Garages to Hide Counter Clutter

Leaving a toaster and a blender on the counter instantly degrades the luxury feel of a kitchen. I built a dedicated appliance garage with a retractable pocket door to solve this. The hardware for the retractable door cost about $400, but it hides my bulky $199 Breville toaster and my coffee grinder. You pull the door down, and the mess vanishes. A common mistake people make is storing heavy appliances in lower cabinets. You won’t use your stand mixer if you have to deadlift it from an awkward squatting position every time you want to bake. An appliance garage keeps these tools at counter height, plugged into the wall, and ready to use. Once you finish your morning coffee routine, you simply slide the door shut, and the kitchen returns to a pristine state. You might also like: 16 How To Declutter Your Home Worth Trying
8. Specify Generous Island Clearances

Cramming a large island into a narrow kitchen makes the space feel cheap and cramped. To ensure proper flow, you must allow at least 42 inches of clearance on all sides of the kitchen island. I initially tried to get away with a 36-inch clearance in my last house, and I constantly bumped into my husband while we were unpacking grocery bags from Trader Joe’s. If you have multiple cooks or a high-traffic household, increase that clearance to 48 inches. A standard luxury island length ranges from 5 to 7 feet, with a width of 3 to 4 feet. If your room dimensions can’t support a 42-inch walkway around a 3-foot wide island, you’re better off installing a peninsula. Forcing an island into a small footprint destroys the functionality of the room. You might also like: 15 Minimalist Goth Home for Every Budget
9. Install Layered and Integrated LED Lighting

Overhead recessed lighting casts harsh shadows on your workspace. You need layered lighting to make the space functional. I installed Philips Hue LED light strips under my upper cabinets for about $89 per 80-inch strip. Most people get this wrong by installing the light strip at the back of the cabinet near the backsplash. You must install the track at the front edge of the upper cabinet, facing straight down. This illuminates the center of your countertop where your hands actually work. I also recommend interior cabinet lighting on a simple hinge switch. When you open a dark pantry cabinet, an integrated LED strip automatically turns on, allowing you to read the labels on small spice jars without turning on the main overhead lights. It’s a small detail that makes daily use much easier.

Kitchen Utensils Set – 34 PCS Non-Stick Silicone Cooking
Kitchen Utensils Set – 34 PCS Non-Stick Silicone Cooking Utensils Set has been one of the most consistently praised picks in this category. 202 reviewers averaged 4.5/5.
10. Choose Warm, Muted Color Palettes Over Stark White

The all-white kitchen is notoriously difficult to keep clean and often feels like a sterile laboratory. I painted my cabinets a stark, brilliant white five years ago and regretted it immediately. Every single drop of coffee or smudge of dirt was amplified. The current trend shifts toward deep, earthy tones and warm neutrals. I repainted using a soft olive green from Sherwin Williams that cost $72 per gallon. Green acts as a neutral but provides grounding depth that white lacks. Warm neutrals like bone, mushroom, or putty hide minor dust and wear much better than pure white. Pair these muted cabinet colors with warm walnut wood accents inside the drawers or on open shelving brackets to prevent the space from feeling cold or uninviting.
11. Opt for Waterfall Countertops and Slab Backsplashes

Grout lines are the enemy of a clean aesthetic. Scrubbing tomato sauce out of white subway tile grout is a miserable chore. I eliminated this problem by extending my countertop material directly up the wall as a full-height slab backsplash. Using a continuous piece of quartz or marble creates a completely smooth, wipeable surface. Expect to pay an additional $2,000 to $3,500 for the extra stone slab and fabrication, but the visual impact is massive. I paired this with a waterfall edge on the island, where the stone extends down the sides to the floor. This frames the cabinetry in a solid block of stone, hiding the side panels of the base cabinets and reinforcing the heavy, permanent feel of the island. It removes all visual interruptions from the horizontal plane.
12. Integrate Hidden Charging Stations and Tech Hubs

Cords trailing across a beautiful stone island look terrible. I used to have three different white Apple charging cables tangled around a bowl of fruit. To fix this, I installed flush-mount wireless charging pads directly into the quartz countertop. These units cost about $45 each and require your fabricator to route a shallow recess under the stone. You just set your phone on a specific spot on the counter, and it charges through the stone. For appliances that need standard plugs, use pop-up outlets tucked into the far corners of the island. These sit perfectly flush with the surface until you press them. It keeps the surface entirely flat while ensuring you always have power for a laptop or a hand mixer when you need it.

Mfacoy Spoon Rest for Stove Top
Mfacoy Spoon Rest for Stove Top punches above its price — 796 buyers rated it 4.5 stars. I would buy it again.
13. Add Climate-Controlled Storage Zones

Relying on a single massive refrigerator usually leads to disorganized, overflowing shelves. I bought a 24-inch Zephyr undercounter beverage fridge for $850 and installed it at the end of my island. Moving all the sparkling water, wine, and kids’ juice boxes out of the main refrigerator freed up an enormous amount of space for bulky produce hauls from Sprouts. Specialized storage zones maintain better organization. You can also install a warming drawer directly under your wall oven. If you cook large meals, a $900 warming drawer keeps side dishes at a safe 140 degrees while you finish roasting the main course. Dispersing your cooling and heating zones prevents traffic jams at the main refrigerator and keeps the kitchen highly functional during busy dinner hours.
14. Use Undercabinet Plug Molding for a Clean Backsplash

Nothing ruins a beautiful, expensive slab backsplash faster than cutting six rectangular holes into it for cheap plastic wall outlets. I made this mistake in my first house, and the white plastic covers completely disrupted the dark gray veining of the marble. The solution is under-cabinet plug molding. I used a Legrand power track system that cost about $120. It mounts directly under the upper cabinets, hiding the outlets completely out of sight. You plug your appliances in by reaching under the cabinet. The wall remains a solid, unbroken plane of stone. If you don’t have upper cabinets, specify pop-up outlets in the counter or match your outlet covers exactly to your backsplash material using custom-painted stone-cast plates. Never settle for standard white plastic on a premium surface.
15. Embrace Sustainable Materials in Your Luxury Minimalist Kitchen

Luxury no longer means wasteful. Choosing sustainable materials adds a layer of quiet quality to the room. I installed solid bamboo flooring throughout my kitchen, which cost roughly $5.99 per square foot. Bamboo is highly durable, water-resistant, and regenerates much faster than traditional oak hardwoods. You can also source recycled stone composites for secondary prep areas or pantry counters. When selecting cabinetry, ask your builder for FSC-certified wood and low-VOC finishes. Standard cabinet glues and paints off-gas formaldehyde for months, leaving a sharp chemical smell in your house. Specifying eco-friendly materials ensures the air quality in your home remains clean. It proves that a minimalist approach applies to your environmental footprint just as much as your visual design.

Kitchen Gadgets Set 5 Pieces
Honestly, Kitchen Gadgets Set 5 Pieces surprised me — sturdier than it looks in the photos, and over 49 buyers gave it 4.5 stars.
16. Install Modular Drawer Organizers

A minimalist exterior means nothing if your drawers are a chaotic mess of tangled whisks and spatulas. I threw away my cheap plastic drawer bins and installed the LEICHT COMBO system, which runs about $250 per drawer. These use solid wood dividers that lock into place, creating custom compartments for every single utensil. When I open the drawer, the wood grain of the organizers matches the interior cabinet box perfectly. If you buy random plastic trays from Target, they slide around every time you open the drawer, scratching the bottom and creating noise. Measure the exact interior width and depth of your drawers, and buy tension-fit wooden dividers. Giving every single tool a precise, unmoving home is the only way to maintain a truly minimalist workflow.
17. Position Prep Sinks Strategically on Islands

If you have a large island, a secondary prep sink is highly practical, but placement is critical. I’ve seen beautifully designed 8-foot islands ruined because the designer placed an 18-inch prep sink dead in the center. This cuts your usable workspace in half. Always push the prep sink to the far left or right edge of the island. This leaves a massive 6-foot expanse of uninterrupted stone for rolling pasta or setting up a buffet. I use a small, 15-inch wide stainless steel undermount sink for washing vegetables. It sits at the very end of the island, directly across from the stovetop. This allows me to wash produce and pivot 180 degrees to drop it into a hot pan without walking across the room. Trust me on this.
18. Select High-End, Restrained Fixtures

Your kitchen faucet acts as the primary sculptural element in a minimalist kitchen. Avoid overly ornate designs with exposed springs or bulky handles. I installed a Kohler Sensate touchless faucet for $850. It features a simple, sweeping matte black arch. The touchless feature is highly practical when my hands are covered in raw chicken juice from Walmart and I don’t want to contaminate the handle. The water turns on with a simple wave of my hand. Keep the finish of your faucet consistent with your cabinet hinges and lighting fixtures. If you choose matte black for the faucet, use matte black for your under-cabinet lighting housings. Restraint in your hardware choices ensures the kitchen looks intentional, grounded, and quietly expensive.
Creating this level of simplicity requires careful planning and a strict refusal to compromise on functional details. I’ve wasted money on cheap hardware and poorly planned layouts in the past, and it always resulted in a kitchen that felt chaotic despite my best efforts to keep it clean. If you stick to these 18 rules, you’ll end up with a space that naturally resists clutter and makes daily cooking highly efficient. Focus on hiding the mechanics, investing in matte natural materials, and measuring your clearances carefully. I’d highly recommend saving these specific measurements and material names for your next contractor meeting. Pin this guide so you won’t forget the exact dimensions and hardware systems when it’s time to start your remodel.
Frequently Asked Questions
What defines a luxury minimalist kitchen?
A luxury minimalist kitchen prioritizes high-end natural materials, integrated appliances, and handleless cabinetry to eliminate visual clutter. It focuses on functional workflow and hidden storage rather than decorative elements, creating a calm, cohesive space.
How much clearance do I need around a kitchen island?
You need a minimum of 42 inches of clearance on all sides of a kitchen island for proper workflow. If your kitchen has multiple cooks or high foot traffic, increase this clearance to 48 inches.
Are waterfall countertops still in style for 2026?
Yes, waterfall countertops remain highly relevant for minimalist designs in 2026. They frame the island in a solid block of stone, hiding cabinet side panels and removing visual interruptions for a seamless, heavy aesthetic.
How do I hide appliances in a minimalist kitchen?
Use fully integrated, panel-ready appliances for refrigerators and dishwashers. For small countertop items like toasters and blenders, install an appliance garage with a retractable pocket door at counter height to keep them accessible but hidden.
